![]()
A common bioinformatics problem which faces researchers is the need to incorporate multiple alignments into presentations or documents. Although programs such as Omiga and GCG will allow you to export alignments they suffer from a couple of common problems.
To get round these problems it is possible to use a free package called Genedoc to create fully configurable multiple alignment figures which will import directly into Word as normal text, and which will retain their shading.
Genedoc is a multiple alignment display program. It will not calculate an alignment for you, but will only display a previously calculated alignement. Genedoc requires your alignments to be in Multiple Sequence Format (.msf). This is the format automatically generated by pileup in GCG, it is an export option from within ClustalX (under Alignment -> Output Format Options), and can be created by AlignX in VectorNTI by selecting Project -> Export MSF Format.
Genedoc is a Windows program and is available for free. It is one of the programs available as part of the Babraham molbio software repository, and this is the best way to access it.
To start Genedoc you should click on the Gendoc icon in the Molbio Software Repository folder
To load in your alignment simply select File -> Open from the main menu, then pick out your MSF file. You should see the alignment open in the main window.
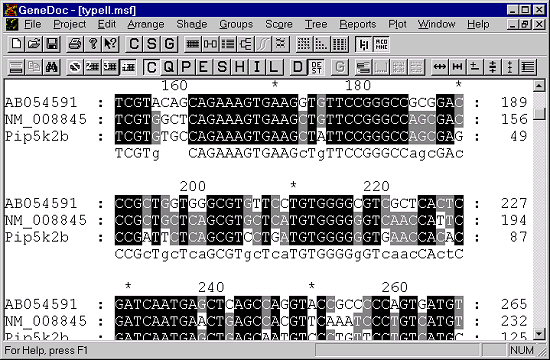
The alignment will automatically wrap to the size of your screen so you can see as much or as little of the alignment as you like.
Genedoc has a bewildering number of options for altering the view of the alignment. Fortunately you only ever need a small fraction of the options available, so don't worry about it! You can see the main page of options by selecting Project -> Configure.

The main options you will need are:
This setting allows you to fix the number of residues displayed on a single line. It is a good idea to fix this value to a round number so that counting bases is easier. For a standard report 60 characters per line is about right, for a thesis with big margins you might want to reduce this to 50.
This option specifies whether you want a consensus line or not, and if you do have one whether it comes above or below the alignment. Be warned that the alphabet used by Genedoc for protein consensus sequences has a lot of degeneracy codes and can be difficult to understand. When in doubt lose the consensus - you don't really need it if you have similarity shading on your alignment anyway.
If you wish to alter the names or positions of the sequences in your alignment then this is possible within the program, you can also delete sequences entirely. To open the Sequence name editor select Project -> Edit Sequence List.
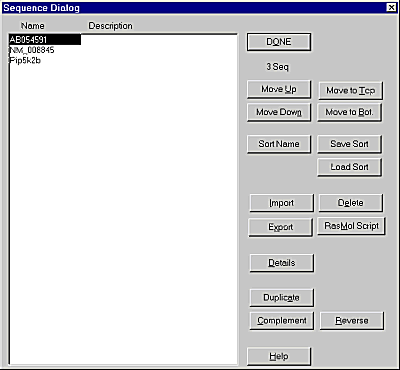
To move sequences up and down in the alignment simply select a sequence from the list then use the "Move Up" and "Move Down" buttons to alter its position.
To rename a sequence select it from the list and press the "Details" button.
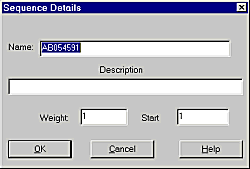
Just change the name and press OK to see the sequence name updated in the main display.
The default view in Genedoc is to shade the alignment based on conservation, and to use 4 levels of shading. The program also has some other shading colour schemes which you can use, but they're all so hideous that I'm not to tell you how to use them here (look in the help file if you really want to)!
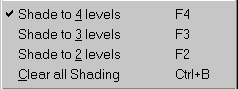 You may however wish to lower the number of levels of shading used by the
program. You can do this using the Shade menu from the top menubar. This
gives you the option of selecting from 1-4 levels of shading.
You may however wish to lower the number of levels of shading used by the
program. You can do this using the Shade menu from the top menubar. This
gives you the option of selecting from 1-4 levels of shading.
 Sometimes you may wish to manually highlight a region of an alignment, and
Genedoc provides a manual shading tool to allow you to do this. To start
the tool select Shade -> Manual Shade Mode. This should open a small window
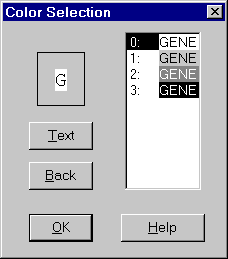
from within which you can select the colour scheme you wish to use for
your manual shading. Once you have picked this you simply drag your mouse
over the parts of your alignment you wish to highlight.
Sometimes you may wish to manually highlight a region of an alignment, and
Genedoc provides a manual shading tool to allow you to do this. To start
the tool select Shade -> Manual Shade Mode. This should open a small window
from within which you can select the colour scheme you wish to use for
your manual shading. Once you have picked this you simply drag your mouse
over the parts of your alignment you wish to highlight.
If you later want to clear your manual shading then simply select Shade -> Clear All Man Shade.
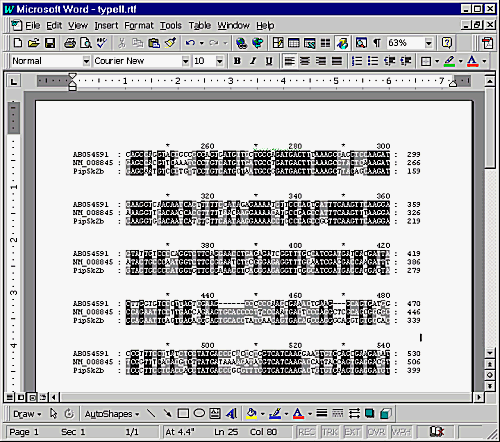
Once you're happy with how your alignment looks you can export it to a Rich Text format file, which can later be loaded into Word for viewing/ printing.
Before you export the alignment you need to select which parts of it you want to work with. To do this select Edit -> Select Blocks for copy, then highlight the sequence blocks you want to export. Selections must be continuous, so if you want the whole alignment simply select the first block, then the last block and everything in the middle will be picked up automatically.
Once you have selected the blocks you want you export them by selecting Edit -> Copy Selected Blocks to -> RTF File. Pick somewhere appropriate to save this new file.
Word understands the RTF file format so you can open these file using the normal File -> Open mechanism. You can also open an RTF file by simply double clicking on it.
When you first open the file you may find that the different sequences don't line up. This will be because the default font settings are not allowing everything to fit on one line. To get around this, select Edit -> Select All, from the font list in the main toolbar select Courier New, then decrease the font size until everything magically lines up.
To put the alignment into PowerPoint you can copy and paste it out of Word. Do not import the RTF file directly into PowerPoint as you will lose the shading. Also do not paste into a text frame in PowerPoint, let it create its own Word Object window and the shading will be preserved.